상품 유형 관리에 이벤트 항목 추가
영카트 상품 유형 관리에는 기본적으로 히트, 추천, 신규, 인기, 할인 항목이 있습니다.
여기에 항목을 하나 더 추가해보겠습니다.
강좌 예제는 이벤트 상품으로 표기했지만 명칭은 원하시는 걸로 바꾸면 됩니다.
수정할 부분이 상당히 많습니다. 여태 했던 강좌 중에 분량이 제일 많네요.
직접 해보면서 정리한 건데 내용이 너무 많아서 잘못 정리했을 수도 있습니다.
나중에 원본으로 되돌려서 아래 내용을 바탕으로 다시 검수를 해보겠습니다.
쇼핑몰관리 > 쇼핑몰 설정 페이지
1. adm/shop_admin/configform.php
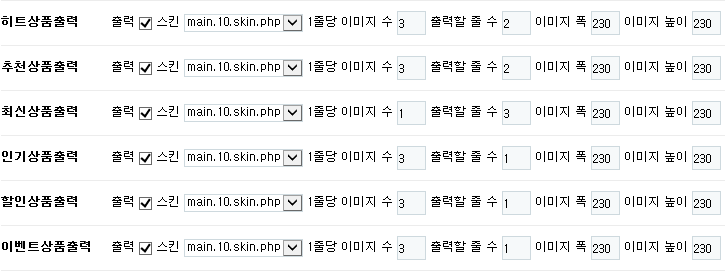
쇼핑몰 초기화면 설정에 항목 추가 (아래 내용 전체 추가)
<tr>
<th scope="row">이벤트상품출력</th>
<td>
<label for="de_type6_list_use">출력</label>
<input type="checkbox" name="de_type6_list_use" value="1" id="de_type6_list_use" <?php echo $default['de_type6_list_use']?"checked":""; ?>>
<label for="de_type6_list_skin">스킨</label>
<select name="de_type6_list_skin" id="de_type6_list_skin">
<?php echo get_list_skin_options("^main.[0-9]+\.skin\.php", G5_SHOP_SKIN_PATH, $default['de_type6_list_skin']); ?>
</select>
<label for="de_type6_list_mod">1줄당 이미지 수</label>
<input type="text" name="de_type6_list_mod" value="<?php echo $default['de_type6_list_mod']; ?>" id="de_type6_list_mod" class="frm_input" size="3">
<label for="de_type6_list_row">출력할 줄 수</label>
<input type="text" name="de_type6_list_row" value="<?php echo $default['de_type6_list_row']; ?>" id="de_type6_list_row" class="frm_input" size="3">
<label for="de_type6_img_width">이미지 폭</label>
<input type="text" name="de_type6_img_width" value="<?php echo $default['de_type6_img_width']; ?>" id="de_type6_img_width" class="frm_input" size="3">
<label for="de_type6_img_height">이미지 높이</label>
<input type="text" name="de_type6_img_height" value="<?php echo $default['de_type6_img_height']; ?>" id="de_type6_img_height" class="frm_input" size="3">
</td>
</tr>
모바일 쇼핑몰 초기화면 설정에 항목 추가 (아래 내용 전체 추가)
<tr>
<th scope="row">이벤트상품출력</th>
<td>
<label for="de_mobile_type6_list_use">출력</label>
<input type="checkbox" name="de_mobile_type6_list_use" value="1" id="de_mobile_type6_list_use" <?php echo $default['de_mobile_type6_list_use']?"checked":""; ?>>
<label for="de_mobile_type6_list_skin">스킨</label>
<select id="de_mobile_type6_list_skin" name="de_mobile_type6_list_skin">
<?php echo get_list_skin_options("^main.[0-9]+\.skin\.php", G5_MSHOP_SKIN_PATH, $default['de_mobile_type6_list_skin']); ?>
</select>
<label for="de_mobile_type6_list_mod">1줄당 이미지 수</label>
<input type="text" name="de_mobile_type6_list_mod" value="<?php echo $default['de_mobile_type6_list_mod']; ?>" id="de_mobile_type6_list_mod" class="frm_input" size="3">
<label for="de_mobile_type6_list_row">출력할 줄 수</label>
<input type="text" name="de_mobile_type6_list_row" value="<?php echo $default['de_mobile_type6_list_row']; ?>" id="de_mobile_type6_list_row" class="frm_input" size="3">
<label for="de_mobile_type6_img_width">이미지 폭</label>
<input type="text" name="de_mobile_type6_img_width" value="<?php echo $default['de_mobile_type6_img_width']; ?>" id="de_mobile_type6_img_width" class="frm_input" size="3">
<label for="de_mobile_type6_img_height">이미지 높이</label>
<input type="text" name="de_mobile_type6_img_height" value="<?php echo $default['de_mobile_type6_img_height']; ?>" id="de_mobile_type6_img_height" class="frm_input" size="3">
</td>
</tr>
2. adm/shop_admin/configformupdate.php
상품 유형 항목 type6 추가
기존에 있던 항목을 복사해서 숫자만 6으로 해서 각각 추가하면 됩니다.
PC용과 모바일 각각 6개씩 입니다.
de_type6_list_use = '{$_POST['de_type6_list_use']}',
de_type6_list_skin = '{$_POST['de_type6_list_skin']}',
de_type6_list_mod = '{$_POST['de_type6_list_mod']}',
de_type6_list_row = '{$_POST['de_type6_list_row']}',
de_type6_img_width = '{$_POST['de_type6_img_width']}',
de_type6_img_height = '{$_POST['de_type6_img_height']}',
..............................................
..............................................
de_mobile_type6_list_use = '{$_POST['de_mobile_type6_list_use']}',
de_mobile_type6_list_skin = '{$_POST['de_mobile_type6_list_skin']}',
de_mobile_type6_list_mod = '{$_POST['de_mobile_type6_list_mod']}',
de_mobile_type6_list_row = '{$_POST['de_mobile_type6_list_row']}',
de_mobile_type6_img_width = '{$_POST['de_mobile_type6_img_width']}',
de_mobile_type6_img_height = '{$_POST['de_mobile_type6_img_height']}',
...............................................
정상적으로 수정된 화면 (모바일 설정도 동일)

쇼핑몰관리 > 상품 유형 관리 페이지
1.adm/shop_admin/itemtypelist.php
상단 쿼리 부분에 it_type6 추가 (쉼표 주의)
$sql = " select it_id,
it_name,
it_type1,
it_type2,
it_type3,
it_type4,
it_type5,
it_type6
$sql_common
$sql_order
limit $from_record, $rows ";
$result = sql_query($sql);
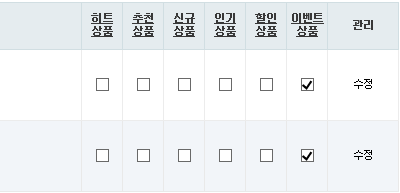
tr 타이틀 부분에 it_type6 추가
<tr>
<th scope="col"><?php echo subject_sort_link("it_id", $qstr, 1); ?>상품코드</a></th>
...................................................
...................................................
<th scope="col"><?php echo subject_sort_link("it_type5", $qstr, 1); ?>할인<br>상품</a></th>
<th scope="col"><?php echo subject_sort_link("it_type6", $qstr, 1); ?>이벤트<br>상품</a></th>
<th scope="col">관리</th>
</tr>
바로 아래에 있는 항목에도 추가
..........................................................................................
..........................................................................................
<td class="td_chk">
<label for="type5_<?php echo $i; ?>" class="sound_only">할인상품</label>
<input type="checkbox" name="it_type5[<?php echo $i; ?>]" value="1" id="type5_<?php echo $i; ?>" <?php echo ($row['it_type5'] ? 'checked' : ''); ?>>
</td>
<td class="td_chk">
<label for="type6_<?php echo $i; ?>" class="sound_only">이벤트상품</label>
<input type="checkbox" name="it_type6[<?php echo $i; ?>]" value="1" id="type6_<?php echo $i; ?>" <?php echo ($row['it_type6'] ? 'checked' : ''); ?>>
</td>
..........................................................................................
2. adm/shop_admin/itemtypelistupdate.php
기존 코드 참고해서 it_type6 추가 (쉼표 주의)
for ($i=0; $i<count($_POST['it_id']); $i++)
{
$sql = "update {$g5['g5_shop_item_table']}
set it_type1 = '{$_POST['it_type1'][$i]}',
it_type2 = '{$_POST['it_type2'][$i]}',
it_type3 = '{$_POST['it_type3'][$i]}',
it_type4 = '{$_POST['it_type4'][$i]}',
it_type5 = '{$_POST['it_type5'][$i]}',
it_type6 = '{$_POST['it_type6'][$i]}'
where it_id = '{$_POST['it_id'][$i]}' ";
sql_query($sql);
}
정상적으로 수정된 화면

쇼핑몰관리 > 상품관리 > 상품 수정 페이지
1. adm/shop_admin/itemform.php
상품 유형 항목 it_type6 추가
...........................................................
...........................................................
<input type="checkbox" name="it_type4" value="1" <?php echo ($it['it_type4'] ? "checked" : ""); ?> id="it_type4">
<label for="it_type4">인기 <img src="<?php echo G5_SHOP_URL; ?>/img/icon_best.gif" alt=""></label>
<input type="checkbox" name="it_type5" value="1" <?php echo ($it['it_type5'] ? "checked" : ""); ?> id="it_type5">
<label for="it_type5">할인 <img src="<?php echo G5_SHOP_URL; ?>/img/icon_discount.gif" alt=""></label>
<input type="checkbox" name="it_type6" value="1" <?php echo ($it['it_type6'] ? "checked" : ""); ?> id="it_type6">
<label for="it_type6">이벤트 <img src="<?php echo G5_SHOP_URL; ?>/img/icon_event.gif" alt=""></label>
............................................................
2. adm/adm/shop_admin/itemformupdate.php
아래 부분에 it_type6 추가
$sql_common = " ca_id = '$ca_id',
ca_id2 = '$ca_id2',
......................................
......................................
it_type4 = '$it_type4',
it_type5 = '$it_type5',
it_type6 = '$it_type6',
it_basic = '$it_basic'
같은 파일 좀 더 아래에서..
// 동일 분류내 상품 동일 옵션 적용 부분에 it_type6 추가 (쉼표 주의)
if(is_checked('chk_ca_it_type')) $ca_fields .= " , it_type1 = '$it_type1', it_type2 = '$it_type2', it_type3 = '$it_type3', it_type4 = '$it_type4', it_type5 = '$it_type5', it_type6 = '$it_type6' ";
같은 파일 좀 더 아래에서..
// 모든 상품 동일 옵션 적용 부분에 it_type6 추가 (쉼표 주의)
if(is_checked('chk_all_it_type')) $all_fields .= " , it_type1 = '$it_type1', it_type2 = '$it_type2', it_type3 = '$it_type3', it_type4 = '$it_type4', it_type5 = '$it_type5', it_type6 = '$it_type6' ";
정상적으로 수정된 화면

DB 추가 작업
1. g5_shop_item 테이블에 필드 추가
adm/shop_admin/itemform.php 파일에 아래 코드를 추가
// 상품유형 항목 추가 it_type6
if(!sql_query(" select it_type6 from {$g5['g5_shop_item_table']} limit 1 ", false)) {
sql_query(" ALTER TABLE `{$g5['g5_shop_item_table']}`
ADD `it_type6` tinyint(4) NOT NULL DEFAULT '0' AFTER `it_type5` ", true);
}
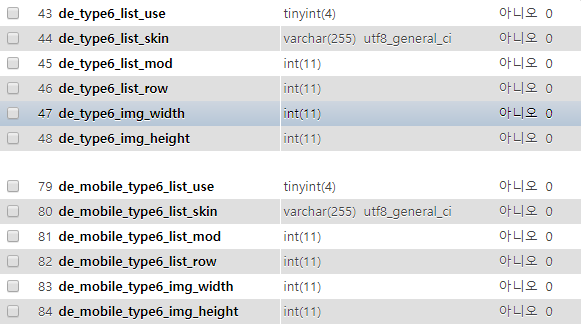
2. g5_shop_default 테이블에 필드 추가
adm/shop_admin/configform.php 파일에 아래 코드를 추가
// 상품유형 항목 추가
if(!isset($default['de_type6_list_use'])) {
sql_query(" ALTER TABLE `{$g5['g5_shop_default_table']}`
ADD `de_type6_list_use` TINYINT(4) NOT NULL DEFAULT '0' AFTER `de_type5_img_height`,
ADD `de_type6_list_skin` VARCHAR(255) NOT NULL DEFAULT '0' AFTER `de_type6_list_use`,
ADD `de_type6_list_mod` INT(11) NOT NULL DEFAULT '0' AFTER `de_type6_list_skin`,
ADD `de_type6_list_row` INT(11) NOT NULL DEFAULT '0' AFTER `de_type6_list_mod`,
ADD `de_type6_img_width` INT(11) NOT NULL DEFAULT '0' AFTER `de_type6_list_row`,
ADD `de_type6_img_height` INT(11) NOT NULL DEFAULT '0' AFTER `de_type6_img_width`,
ADD `de_mobile_type6_list_use` TINYINT(4) NOT NULL DEFAULT '0' AFTER `de_mobile_type5_img_height`,
ADD `de_mobile_type6_list_skin` VARCHAR(255) NOT NULL DEFAULT '0' AFTER `de_mobile_type6_list_use`,
ADD `de_mobile_type6_list_mod` INT(11) NOT NULL DEFAULT '0' AFTER `de_mobile_type6_list_skin`,
ADD `de_mobile_type6_list_row` INT(11) NOT NULL DEFAULT '0' AFTER `de_mobile_type6_list_mod`,
ADD `de_mobile_type6_img_width` INT(11) NOT NULL DEFAULT '0' AFTER `de_mobile_type6_list_row`,
ADD `de_mobile_type6_img_height` INT(11) NOT NULL DEFAULT '0' AFTER `de_mobile_type6_img_width` ", true);
}
추가 후 쇼핑몰 관리 > 쇼핑몰 설정 페이지 및 상품 등록 페이지 1회 이상 접속 후
phpmyadmin 으로 필드가 제대로 생성되었는지 확인.
위 방법 말고 phpmyadmin 으로 직접 필드를 추가해도 됩니다.
g5_shop_default 테이블에 필드가 정상적으로 생성된 화면

g5_shop_item 테이블에 필드가 정상적으로 생성된 화면

기타 작업
1. lib/shop.lib.php
// 상품이미지에 유형 아이콘 출력 함수에 it_type6 추가
if ($it['it_type6'])
$icon .= '<img src="'.G5_SHOP_URL.'/img/icon_event.gif" alt="이벤트상품">';
2. 아이콘 이미지 추가

icon_event.gif 이름으로 이미지를 새로 만들어서 shop/img/ 폴더에 업로드
3. 메인페이지 수정 shop/index.php
원하는 위치에 아래 내용 전체 추가
<?php if($default['de_type6_list_use']) { ?>
<!-- 할인상품 시작 { -->
<section class="sct_wrap">
<header>
<h2><a href="<?php echo G5_SHOP_URL; ?>/listtype.php?type=6">이벤트상품</a></h2>
<p class="sct_wrap_hdesc"><?php echo $config['cf_title']; ?> 이벤트상품 모음</p>
</header>
<?php
$list = new item_list();
$list->set_type(6);
$list->set_view('it_id', false);
$list->set_view('it_name', true);
$list->set_view('it_basic', true);
$list->set_view('it_cust_price', true);
$list->set_view('it_price', true);
$list->set_view('it_icon', true);
$list->set_view('sns', true);
echo $list->run();
?>
</section>
<!-- } 할인상품 끝 -->
<?php } ?>
4. 유형별 상품 목록 페이지 shop/listtype.php
기존 코드 참고해서 $type == 6 항목 추가
if ($type == 1) $g5['title'] = '히트상품';
else if ($type == 2) $g5['title'] = '추천상품';
else if ($type == 3) $g5['title'] = '최신상품';
else if ($type == 4) $g5['title'] = '인기상품';
else if ($type == 5) $g5['title'] = '할인상품';
else if ($type == 6) $g5['title'] = '이벤트상품';
else
.......................................
.......................................
댓글목록 +3
댓글목록

관리자님의 댓글
관리자 작성일
DB에 추가 필드까지 정상적으로 생성돼야 화면이 제대로 뜰 겁니다.
해보면서 느낀 건...
웬만하면 새로 추가하지 마시고 기존에 있던 항목 중에서 사용 빈도가 낮은 걸 이미지만 바꿔서 사용하는 걸 추천드립니다.
수정할 게 너무 많네요.
기존 아이콘 수정해서 사용하는 방법
https://gnustudy.com/bbs/board.php?bo_table=yc_tip&wr_id=153

신비님의 댓글의 댓글
신비 작성일세심한 조언까지.................감동 =====b

관리자님의 댓글
관리자 작성일추가한 후 테스트하실 땐 상품유형 출력 부분에서 체크박스를 체크하고 확인해야 출력됩니다.

